|
InfoTip extension allow you to supply
a short text that will be shown when user hovers the document. Use it
to display an advanced document information.
The InfoTip handler is an ActiveX
library like all other Shell Extensions. The first step to do is to create
a new ActiveX Library. Create it with the following sequence of operations:
open the Repository dialog using File | New | Other... menu, then select
the ActiveX tab and click the ActiveX Library icon.
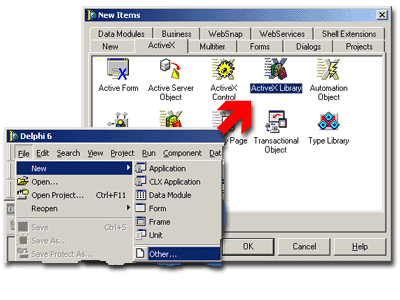
Fig. 1. New ActiveX Library creation.
Save the created project.
The next step is to add the instance of TSxDataModule
to the project. Every Shell+ component should be placed on SxDataModule
1. This special descendant of TDataModule
supplies several internal methods that allow Shell+ components to safely
operates in multiple Shell threads and automates their registration and
initialization. Note that you can place several Shell+ components onto
the same SxDataModule as well as you can add multiple TSxDataModule instances
to your project. It is easy to add new SxDataModule to the project - just
click corresponding icon in the Repository:
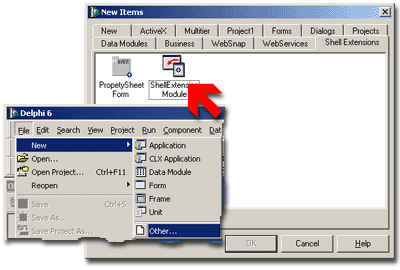
Fig. 2. How to create new SxDataModule instance.
You can save the project now.
 |
Now add the TSxInfoTip
component from the Shell+ palette page. This component wraps interfaces
required be shell and allows you to handle shell requests in a simple
manner.
|
The properties of TSxInfoTip
component are as follows:
| Property Name |
Property Value and Description |
| CLSID |
Unique identifier, GUID, that is used
by system to identify the extension. It is generated automatically
when you place component onto SxDataModule. |
| Description |
Extension description, enter desired text
here. |
| ExtensionName |
Short extension name, MyInfoTip for example. |
| FileType |
Type of files to be serviced by the extension.
Files of specified type will be processed only. This example uses
the "txtfile" and handles most of text files such as ini,
log, txt and some other. |
| Name |
This property is a native Delphi's component
name, nothing special. |
| InfoTip |
Use this property to specify static text
to be displayed in the tip. If you need to supply different tips for
different files then use OnGetInfoTip event instead. |
| OverwriteExistent |
Currently only one InfoTip extension can
be registered for the given file type simultaneously. Use this property
to control whether to override previously installed handler. Set the
property to True to allow overriding of the existing infotip handler.
In addition you can use the OnKeyAlreadyExist event handler
to define CLSID of previously installed Infotip handler. You can use
this value for backup purposes for example. |
Table 1. TSxInfoTip properties.
Use Object Inspector to set TSxInfoTip
properties as shown below:
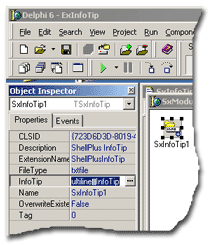
Fig 3. TSxInfoTip properties
Every time Shell needs the InfoTup
text it calls corresponding shell extension interface. As a result the
OnGetInfoTip event is fired in the example. The info text should
be prepared and returned as a result of this event.
Select the Events tab of Object Inspector and
doubleclick the OnGetInfoTip event. Add the following code to the event
handler:
procedure TSxModule1.SxInfoTip1GetInfoTip(Sender: TSxInfoTip;
  var InfoTip: String);
var
  TempStr:TStrings;
begin
  TempStr:=TStringList.Create;
  try
    TempStr.LoadFromFile((Sender as TSxInfoTip).Filename);
    InfoTip:='Words: '+IntToStr(WordCount(TempStr.Text,[' ']))+#13+#10+
             'Lines: '+IntToStr(TempStr.Count)+#13+#10+
             'Pages: '+InttoStr(TempStr.Count div 60);
  finally
    TempStr.Free;
  end;
end;
|
Add and auxilliary procedure to
count words in the text document:
function WordCount(const S: string; const WordDelims: TCharSet): Integer;
var
  SLen, I: Cardinal;
begin
  Result := 0;
  I := 1;
  SLen := Length(S);
  while I <= SLen do begin
    while (I <= SLen) and (S[I] in WordDelims) do Inc(I);
    if I <= SLen then Inc(Result);
    while (I <= SLen) and not(S[I] in WordDelims) do Inc(I);
  end;
end;
|
Save the project and compile it
- it is ready now! As well as any other ActiveX library the Shell+ project
requires registration. You can register it in several ways:
- from command prompt using MS regsvr32 utility: regsvr32.exe
Project1.dll
- from command prompt using Borland's tregsvr utility:
tregsvr Project1.dll
To know more about shell extension installation please follow
the link.
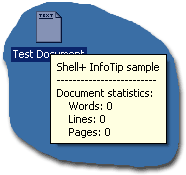
Test the
example now. To do it create and empty text document on the desktop or
in any other folder. Move mouse pointer over this file and wait a couple
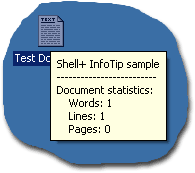
of seconds. The InfoTip will pop-up, it will look like shown below:
Enter a couple of text lines into
the document now then look on info tip again:
Don't forget to uninstall the example
when all tests are finished. Note that it is an example only and it will
show its confirmation window until you will not unregister it. As well
as installation the uninstallation can be done in many ways:
- from command prompt using MS regsvr32 utility: regsvr32.exe
/u Project1.dll
- from command prompt using Borland's tregsvr utility:
tregsvr -u Project1.dll
The detailed information about extension uninstallation
is available here.
Use
links below to download source codes of this example as well as binary
files:
 Top
Top
|

